Connect to Multiple Git Accounts of the Same Vendor (GitHub, GitLab) Portal

As a developer, we often need to use multiple accounts of a single Git vendor simultaneously. It can happen when a client does not allow outside the organization accounts and signup a new Git account for you.
Table of Contents
Terminologies
- Git Repositories
Git Repositories are a kind of version control used by developers to collaborate on a single project.
- Git Repositories Authentication
The git repository vendors (GitHub, Gitlab, etc) provide two types of authentications, credentials via HTTP(S) and SSH.
- Credentials (HTTP/HTTPS)
It is the simplest method to clone the Git repo. It will ask for the user credentials while cloning the repo from a particular URL the first time and, on successful verification, stores it in the system globally.
- SSH
It is another method to clone the Git repo. It needs an SSH key to be pre-configured in the vendor's portal.
Issues with HTTPS Authentication
- When we clone a repository from a Git Vendor for the first time, we need to add credentials to authenticate. The valid credentials after authentication get saved in the system with the URL, so it has to be unique. It means we can stay connected to only one account at a time.

- When we need to share the Git account for committing the code, we need to share the same password we use to login into the portal. However, some vendors like GitHub and Azure DevOps have opted for separate credentials for cloning repositories.
So, is SSH the way to go?
Yes, we can use SSH to overcome the issues of HTTPS. Also, all the git vendors support it. When using SSH, there is no need to share the credentials of the portal.
Connect to Git via SSH
We can connect to a Git vis SSH from all available OS.
1. Prerequisite (For Windows Only)
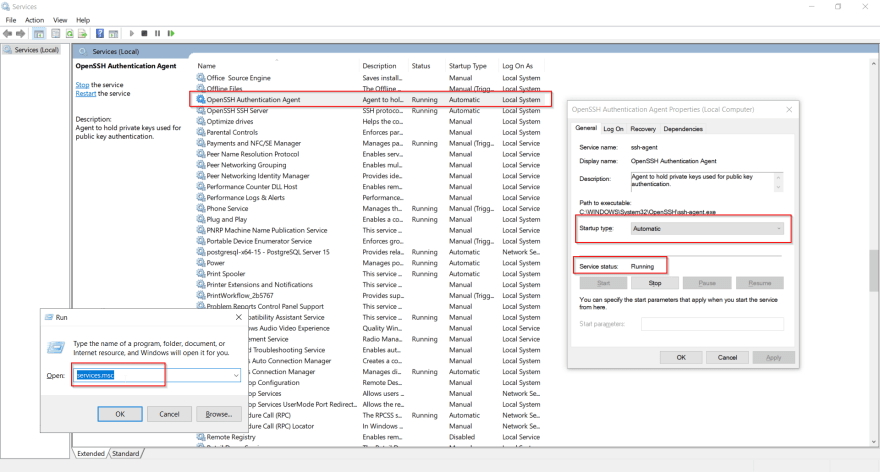
By default, in Windows, the Open SSH service is disabled. We need to check that and update it if required.
To start the service
- Open Run
- Type services.msc
- Find OpenSSH Authentication Agent.
- Check for the status to be running and the startup type to be Automatic
- If the settings do not match the above one,
- Right-click on the service.
- Select Properties.
- If the startup type is not automatic
- Set the startup type to Automatic from the dropdown.
- If the service shows stopped.
- Click Apply if the service status is "stopped" and the start button is still disabled.
- Click on the start button to start the service.
- Click on Apply (If enabled), and OK.
2. Create an SSH Key
- Prerequisites
- Check the encryption of the SSH key with the vendor. Different vendors allow single but different encryption keys.
For example, GitHub allows ed25519, and Azure allows RSA.
- Check the .ssh folder.
The SSH key should also be in the specific location in the system to be accessed by Git.
Locations:
Windows: C:\Users[your username]. ssh (replace [your username] with actual username)
Linux: /home/your-username/.ssh
macOS: /Users/your-username/.ssh
The folders may or may not be available at the location mentioned above. In case of unavailability of the folder, we need to create them at the defined path. Also, in some systems, the folder is hidden.
- Steps
- Open terminal/CMD in the .ssh folder of your system.
- Type the below command.
ssh-keygen -t ed25519 -C "<youremail@domain.com>"You will be prompted to add a file name and provide a meaningful name that resembles the email.
Notes
- Kindly note that you need to change encryption according to your current vendor.
Here are some examples:
GitHub: ed25519
GitLab: rsa, ed25519, etc
Azure DevOps: rsa - Add the file name for the key file. It should be meaningful and related to the email used for Git access.
- Keep the paraphrase blank by pressing Enter/Return twice.
After completion, two files will be created in the .ssh folder, a private key file and a public key file (with a .pub extension).

3. Configure the Git Vendor portal with the created SSH Key
- Go to your vendor portal and find the SSH Keys section.
- Click on add a new SSH key.
- Add a meaningful name to the name field and paste the pub file contents of the SSH key in the SSH key text area.
- Click on Add to save the SSH key in the portal.

Now, you can use the SSH commands directly to clone the repo if there are no other SSH keys enabled for the same vendor.
4. Configure Multiple accounts of the same vendor
Create separate SSH keys for all the required accounts for the vendor by repeating the above steps and getting them registered under their respective git accounts in the vendor portal. To create multiple Git Accounts, you need to repeat the steps from Step 3.
5. Create and save the config file
Create a config file in the .ssh folder.
Add the below code to the config file for each account.
Host "Self-created host to differentiate from others"
HostName "Original host of the git vendor"
IdentityFile ~/.ssh/"SSH key filename"
IdentitiesOnly yes
Example:
Default GitHub Account: mahadikrahul

Host github.com
HostName github.com
IdentityFile ~/.ssh/mahadikrahul-github
IdentitiesOnly yes
You might also need to add the below command for some vendors like Azure.
PubkeyAcceptedAlgorithms +ssh-rsa
HostkeyAlgorithms +ssh-rsa
You can add multiple accounts of the same or different git vendor separated by a blank line. You can also use # to add comments for information about a config added.

To access the repo of different accounts of the same vendor, change the URL of SSH while cloning the repo.
Original SSH command:
git clone git@github.com/<your-repository-name>.git Updated SSH command:
git clone git@github.com-:<name-in-config>/<your-repository-name>.git Change the git config username and email to the respective accounts in the folder, as the global config shall not be the right one for a git account.
We can now access different git accounts of the same vendor without interfering with each other's discreteness by using different SSH command URLs while cloning.
Pro Tip
We can also share the created SSH key files to other systems and clone the repository directly. This way, we can provide access to the repo without even sharing the account credentials.
Conclusion
It is a complex and tedious process to access a repository. But once the default configuration is done, adding other accounts becomes easier. I hope this blog helps you to configure your git accounts easily.
About Author
 Rahul Mahadik started his career journey in 2015 in a .net development company. Currently, he is a full-stack team leader at The One Technologies.
He loves to solve complex issues while taking care of modernizing and optimizing. He is fond of listening to music, spending time with family & friends, and watching movies.